Units of measurement, symbols, significant digits and rounding off
1.1 Units of measurement and symbols
1.2 Significant digits
1.3 Rounding off
1.4 Bias, accuracy and precision
Individual Trees and Logs
2.1 Bole characteristics
2.1.1 Diameter
2.1.2 Height
2.1.3 Bark thickness
2.1.4 Volume
2.1.5 Stem form and taper
2.2 Log characteristics
2.2.1 Diameter
2.2.2 Length
2.2.3 Volume
2.2.4 Weight
2.2.5 Allowance for defect
2.3 Crown characteristics
2.3.1 Width
2.3.2 Depth
2.3.3 Surface area
2.3.4 Volume
2.3.5 Biomass
2.4 Stem analysis
Groups of Trees (Stands)
3.1 Number of trees
3.2 Diameter
3.3 Basal area
3.3.1 Fixed-area plots
3.3.2 Angle count sampling
3.3.3 Advantages and disadvantages of angle count sampling
3.4 Height
3.4.1 Mean height
3.4.2 Predominant height, top height, dominant height
3.4.3 Stand height curve
3.5 Volume
3.6 Crown closure
3.7 Crown biomass
3.8 Growth and increment
References
Appendix 1: Checklist of equipment and materials
[RWG#2] [Copyright] [Index Page] [Next Page] [Last Page]
2.1.2 HEIGHT
The height of a standing tree (total height, h) is defined as 'the vertical distance from ground level to its uppermost point' (Empire Forestry Association 1953). However, in situations where tree lean is common, it is prudent to adopt the definition, 'the length of the tree bole (=main axis) from base to tip' - otherwise, underestimation of standing volume will result. Record the height to either the nearest whole metre or nearest whole decimetre depending on the use of the data and the precision of the measuring instrument.
Total height differs from merchantable height (hm) which is defined as 'the distance from ground level to which a tree is salable' (Ford-Robertson 1971), i.e. to the highest point on the bole where the diameter is not less than some specified value, e.g. 10 cm, or where utilisation of the bole is limited by branching or defect. Merchantable height rather than total height is normally measured in mature hardwood stands: it is measured in the same way as total height.
Heights of trees in Australia are mostly measured either directly using height sticks of 1.5 m long sections or indirectly using hypsometers. Recommended procedures follow.
Height sticks
General
- If possible, use height sticks which are fitted with safety locking clips.
- Use for heights up to 20 m (fibre glass sticks) and 25-30 m (hollow duralumin sticks with a hollow steel ferrule). For taller trees, use a hypsometer.
- Do not use in strong winds.
- Wear safety helmets, field boots (preferably shod with a steel toe cap), and protective glasses to prevent pine needles and other dislodged debris from lodging in the eye.
- Avoid idle chatter and other distractions during measurement. Concentration is essential for crew safety.
- Do not permit inexperienced persons to use height sticks unless supervised. Sound training is essential to minimise measurement error and ensure crew safety.
- Count and record the number of sticks in the set before commencing measurement.
- A crew of two persons is usually appropriate when measuring trees less than 10 metres tall. For taller trees, a 3-person crew is essential, viz. a 'stick person' who erects the sticks, an assistant who stands nearby holding the unused sticks, and an observer who stands well away from the tree.
- Clean the ferrules of the sticks after each day's use and thoroughly check the set each season for straightness and "smooth action".
Duties of the 'stick person'
- Quickly observe the tree's branching habit and other features (lean, etc.) and position yourself at the tree base so that (i) the sun is either behind you or over your left or right shoulder and (ii) the passage for the sticks through the crown is reasonably clear.
- When erecting the sticks:
- Erect them with ferrules pointing downwards.
- Look upwards most of the time.
- To prevent the sticks falling out of the tree, keep their centre of gravity between your person and the tree. Do this by always holding the basal two sticks vertical and leaning the upper sticks inwards to rest against the bole.
- With leaning trees that have 'self-corrected', erect the sticks from a position directly below the point of correction. For trees that have not corrected, attempt to lay the sticks along the upper side of the leaning stem.
- Erect them with ferrules pointing downwards.
- When retrieving sticks:
- constantly look upwards, keep your feet well apart, hold the sticks directly in front of your person, and retrieve smoothly. Right-handed operators should hold the erected sticks in their right hand, which should be held high, and remove the bottom stick with the left hand. The converse applies to left-handed persons.
- Either allow the sticks to slide through the upper hand, clamping and retrieving the sections one by one, or retrieve them hand over hand. Pass each stick to the assistant as it is detached, looking upwards continuously.
- Do not jerk or suddenly pull the sticks downwards. If pressure is felt during retrieval, proceed very cautiously until release is felt. If the sticks suddenly feel light, they have probably parted. If this happens, don't panic. Move your assistant to a safe place away from the tree base while you attempt to reconnect the sticks. Should this cause the upper, parted section to dislodge, drop everything and move rapidly to the opposite side of the tree and away from it.
- If upward movement of the sticks is impeded by a branch or cone, simultaneously shake the sticks laterally and push upwards to guide the tip onto a new path.
- Whenever pressure is felt when erecting the sticks, stop, retrieve at least one stick, and seek a new path before proceeding further.
- To correct sticks which begin to splay outwards on the side of the tree away from you, retrieve several sticks, move closer to the tree and re-erect the sticks.
- To correct sticks which begin to splay behind you, retrieve several sticks, move back 0.3 m to 1 m from the tree base, hold the basal sticks vertical, and proceed to re-erect the sticks.
- If the sticks splay to the point where they begin to fall out of the tree, do not 'fight' them. Rather, move around the sticks so that you face the direction in which they are falling and guide them down so that they fall flat in one continuous piece. Doing otherwise with duralumin sticks can ruin the full set.
- Watch out for falling cones. Should you be aware that a cone has been dislodged, do not move and do not look upwards. Stand erect with shoulders hunched and head inclined slightly forward until the cone hits the ground.
- constantly look upwards, keep your feet well apart, hold the sticks directly in front of your person, and retrieve smoothly. Right-handed operators should hold the erected sticks in their right hand, which should be held high, and remove the bottom stick with the left hand. The converse applies to left-handed persons.
- Stand close beside the stick person and hand over (and retrieve) the sticks in a manner similar to that of a scalpel being passed between a nurse and surgeon.
- Count the sticks both as they are erected and retrieved and check that the counts are consistent with both the original count and the number of unused sticks (sticks have been known to become wedged between branches or cones during retrieval and to have parted without the knowledge of the 'stick person', thus presenting an on-going hazard for anyone working beneath).
- Use a stick graduated in decimetres to measure the odd length at the base of the tree. Measure from ground level to the top of the ferrule of the lowest stick. Add this length to the product of the number of sticks erected and stick length to determine tree height. Check the calculations before recording the result.
Duties of the observer
- Be alert and active at all times. Stand well away from the tree at a position offering a clear view of the tree bole and sticks (angle of observation ≤ 45°ree;). Follow the progress of the sticks both during their erection and retrieval and warn the stick person and assistant should the tip of the sticks begins to splay or a cone or other object be dislodged.
- Ensure that parallax error is eliminated by standing in a plane perpendicular to the vertical plane generated by the upper bole of the tree and the sticks. Define this plane by moving around the tree until its upper axis is obscured by the sticks or vice versa. Then move away from the tree perpendicular to that plane and locate a point on the ground convenient for sighting. Guide the 'stick person' in the up-and-down movement of the sticks until the tops of the tree and the sticks are aligned. At this point, record the height.
- Be fully aware that parallax error is the most common and most serious error encountered when using height sticks!
- Use a hand-held instrument based on trigonometric rather than geometric principles (e.g. Suunto clinometer, Forester Vertex, Haga, Blume Leiss, Relaskop, Abney level, etc.).
- To reduce computation and speed-up the measurement process, use direct reading scales in preference to angular and percentage scales.
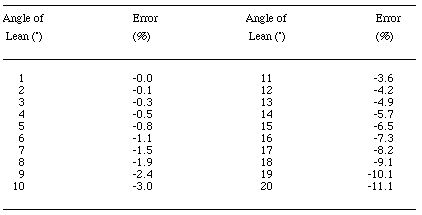
- Visually check the tree for lean before measurement begins. This is essential to minimise serious error in the height estimate (much of the 'noise' in data bases of tree height arises due to failure by measurers to recognise and account for tree lean!). To illustrate this point, consider a tree with a slight lean of 3°ree;. Measuring such a tree as if it is vertical will incur an error ranging from +5.4% to -5.1% depending on the direction from which the tree is observed. For a tree with a lean of 6°ree;, the corresponding errors range from +11.1% to -10.0 % (Table 2.1). These errors are serious!
Table 2.1:

- For vertical trees, carefully set off the horizontal distance in the direction most likely to give a clear view of both the tree tip and base. This distance should be equal to or greater than the height of the tree, i.e. angle of observation to the tree tip should be 45°ree; or less . Measure the distance from the tree centre (offset) to the observer. Failure to set out a horizontal line incurs positive bias.
- For instruments with multiple scales (e.g. Haga, Blume Leiss, Relaskop) take care that the correct scale is read.
- If the tip and base (or plumb point) of a tree are not visible from the appropriate fixed distances incorporated in the instrument in use, proceed as follows:
- move to a position from which both the tip and base (or plumb point) are visible, mark the spot on the ground, and measure the horizontal distance to the tree (or plumb point) (s).
- sight to the tree tip and base (or plumb point) using any scale x on the instrument (e.g. 30 m) and record the readings (ht, hb).
- determine total height (h) as follows:

Note: If the reading to the tree base (or plumb point) is an elevation, hb in Formula 1 is negative.
- move to a position from which both the tip and base (or plumb point) are visible, mark the spot on the ground, and measure the horizontal distance to the tree (or plumb point) (s).
- From the viewing point, take 2-3 readings and average. The precision of these readings should be better than ± 2.5%, i.e. ± 0.5 m in 20 m. If it is not, repeat the measurement.
- Use a range-finder only if it is unavoidable , e.g. assessor working alone. Range-finder attachments to conventional hypsometers do not allow for slope; their targets are mostly designed to be fixed to the fronts of trees (rather than at the sides); additional support is required to set them up at plumb points; and they require a subjective decision to be made. All of these features serve to decrease the accuracy and precision of the height estimate. With 2-person teams, it is more satisfactory, and just as quick, to set out the horizontal distance manually.
- Add the estimates (readings to the tree tip and base) if they are of opposite sign (elevation to tip (+) and depression to base(-)) and subtract them if they are of similar sign, i.e. both elevations (eye of operator below the level of the tree base).
- For precise and accurate measurement, assess height from two positions on the ground establishing sighting lines to the tree which are roughly 90°ree; apart. The two readings should agree within ± 2.5%. If they don't, error in measurement is indicated: repeat the measurement.
- If an appropriate position on the ground cannot be found from which both the tree tip and base are visible, select a position from which the tip is visible and sight both to it and to a visible datum on the lower bole. To derive total height, add the height of the datum above ground to the derived length between the datum and tip.
- In very dense stands, e.g. young, unthinned, unpruned plantations where it is often difficult to locate the tip of a particular tree, have an assistant kick the butt about 60 cm above ground. Movement of the tip will be readily observed.
For trees with a slight lean (≤ 5°ree;), set off the horizontal distance from the geometric centre of the tree bole in a direction perpendicular to the plane of lean. This confines the error to <1% (Table 2.2).
- For leans > 5°ree;, plumb the tip to ground as described later, set off the horizontal distance from the plumb point, sight to the tree tip and the plumb point and, if one line of sight is an elevation and the other a depression, sum the resultant heights to give the height of the vertical component, otherwise subtract them. If necessary, correct the estimated height for displacement as described next below.
- To determine whether or not a correction for lean should be made to the height of the vertical component, apply the formula:

where k=0.1425 ans S-max is the maximum horizontal displacement allowable without correction to restrict to 1% the error incurred by assuming that the height of the vertical component (H-vm) equals the true height. Both H-vm and k are independent of the unit of measurement
Table 2.2: Errors Incurred in Measuring the Height of Leaning Trees having set off the Horizontal Distance from the Tree Base Perpendicular to the Plane of Lean. Angle of Observation = 45°ree;.
- When estimating the total height of trees of deliquescent habit (rounded, spreading crowns), sight through the crown to the point in space judged by eye to be coincident with the crown's upper surface and plumb above the top of the main trunk or bole of the tree, i.e. the point where the crown begins (called `crown break'). Plumb the latter to ground to identify the point from which the horizontal distance is measured.
- On sloping ground, preferably set off the horizontal distance on the contour, otherwise upslope. The former is preferable because it is not uncommon for trees on slopes to lean slightly downhill. If setting out the horizontal distance is impractical or impossible, follow the procedure described below (Formula 5).
- When estimating total tree height using the degree scale of an Abney level or other clinometer, apply the formula:
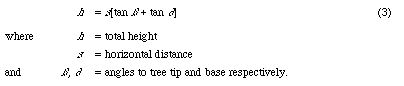
(a) the tangents of the angles, not the angles per se, are added
(b) ∂ is mostly a depression. If it is an elevation, e.g. the observer is downslope and below the level of the tree base, Formula 3 becomes:

- In situations where it is impossible to set off a horizontal distance, measure and record the slope distance (s) and slope angles ß (from the observer to the tree tip) and ø (from the observer to the tree base or to a datum on the lower bole), and apply the formula:

- When using instruments for which the scales are not visible while sighting (e.g. Haga, Blume Leiss), allow several seconds for the oscillating pointer to come to rest before depressing the clamp or break button.
- Don't measure in high winds because, apart from the safety hazard, it is difficult to avoid serious error in the height estimate.
- In permanent sample plots and experimental plots, it is desirable to retain the same viewing position for each measured tree if possible (i.e. from year to year) to improve the precision of estimate of height increment.
- Recorded height data derived from hypsometers do not warrant a decimal point, i.e. if a decimal point is shown, figures after it invariably are not significant .
If the tip of a leaning tree is visible from a point on the ground approximately beneath it, locating its projected position on the ground is done most easily using an instrument which projects a vertical line of sight (e.g. Weir 1959; Khan 1971; Tihonov 1971; Jackson and Petty 1973). For most trees however, the tip is obscured by foliage and the projection has to be done indirectly. The procedure with two and three people respectively is as follows:
(a) Two people: Stand roughly in the plane of lean with the tree tip pointing towards you (operator A) and, using a plumb-bob, define the plane by moving until the vertical line defined by the suspended plumb-bob appears to pass through both the tree tip and base. Now have your assistant (operator B) move into the plane beyond the expected position of the projected tip and turn and face the tree base. Then move out (i.e. A) from the tree base roughly perpendicular to the previously defined plane and define a second plane passing this time through the tip only. Ask your assistant (B) to move towards the tree base until he or she intersects the new plane. Mark this point of intersection, the plumb point, on the ground.
(b) Three people: The procedure is greatly simplified. Two people (A and B) with plumb-bobs stand at positions on the ground from which the respective lines-of-sight to the tree are roughly perpendicular to each other. Each operator defines the vertical plane through the tree tip and then operator C moves to a position on the ground which intersects both planes, and marks the spot.
Ocular estimation of height
An ability to estimate tree height by eye with reasonable accuracy and precision can be developed with practice. Ocular estimation is used in South Australia in stripline assessment of site quality in Pinus radiata plantations aged 9-10 years (heights up to about 18 m) (Lewis et al. 1976, p. 31) and is an important component of the second-stage sampling process in point-3P (P3P) and point-model based (PMB) sampling (Wood and Schreuder 1986). Recommendations relevant to ocular estimation are:
- Train the assessors well and ensure that they 'calibrate their eyes' regularly by checking their estimates against known standards (tree heights measured by instrument).
- When practical, place a 'calibration pole' of known length (preferably 3 m) at the base of each tree being assessed, e.g. in P3P and PMB sampling.